Making Mountain Dulcimers
Here are some discussions of specific methods I use in the construction of Bear Meadow dulcimers. Drop in from time to time and there will be new topics, or expanded treatment of present topics. I hope you find them entertaining, instructive, and provocative.
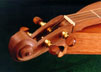 Having supplied ourselves with wood, the new dulcimer begins with carving the scroll peghead and tailpiece. The peghead is carved from a single block of walnut, and is one of the main structural elements of the instrument, and its carving is a major commitment of time and materials, requiring about seven hours to complete.
 The tailblock, the other major structural stabilizer of the instrument, is also carved with a decorative scroll. Its small scroll, and the curve which terminates the sweeep of the sides, takes about an hour and a half to complete.
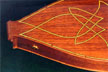 If the Concert Grand or Baby Grand are being built, the back is now marked and prepared for inlaying. The inlay of purfling knots is a traditional ornamentation of the finest musical instruments. After receiving the ornamentation, the back is ready for alignment with the other parts of the body in the building jig.
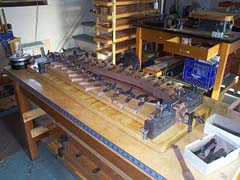
 Then all the main body elements are assembled into the building jig: the peghead,sides, tailpiece, and back get acquainted for the first time and begin a long relationship. After the glue has set, work on the dulcimer's internal structures begins.
![]() While the body is being build, the top is also getting some attention. Tops are made of instrument grade redwood or spruce. Only AAAA spruce and redwood are used for Bear Meadow instruments. The top is quite thin .070" (70 thousandths of an inch).
While the body is being build, the top is also getting some attention. Tops are made of instrument grade redwood or spruce. Only AAAA spruce and redwood are used for Bear Meadow instruments. The top is quite thin .070" (70 thousandths of an inch).
 While work is progressing on the top and body, the fretboard is being brought along, also. The fretboard is the spine of the dulcimer, and gets the best wood available. It must be stable, straight-grained, and acoustically active. We use a small stock of black walnut that is 50 years old (that we know of-it might actually be 20 or so years older than that).
 FlexiFrets® are removable frets. They make it easy to temporarily get a half-fret here and there, and to change modes quickly. (See the article on FlexiFrets® for information on this new development in fretboard technology.) Here is a description of installing FlexiFrets.
 Finally the top, fretboard, and body come together as the top assembly is glued to the body. This is an exacting process, because we want the top to be firmly attached, yet easily removed. For this operation, the body goes back into the building mold.
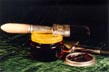 Finishing now begins. The objective is to protect the materials in a way that does not interfere with their acoustic qualities. The goal we pursue in our finishing techniques is to achieve a sensuous, subtly tactile finish that is visually understated. We use premium tung oil-based phenolic resin varnish over a shellac sealer. Final finish is a high carnuba wax, buffed by hand.
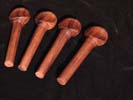 Wooden pegs are machine made from rosewood. Here is an article on fitting and dressing them properly
 The final task is "setup": mounting hardware such as tuning machines or pegs, string pegs, acoustic pickups, and any other incidental hardware. Then we are ready for intonation. And music.