Inlaying the Back Purfling
The actual inlaying of the back's purfling is a dramatic progression. With the addition of each tiny segment, the design springs more to life.
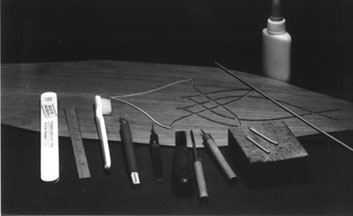
Here are the tools I use for inlaying. Pretty simple, really. By the way, the bottle of yellow glue is no longer used, nor is the nail file. I've started using hide glue--easier to deal with problems. And I use planes and scrapers rather than nail-files to get the inlay down to the same level as the back.
 The first two pieces are laid in. The shorter piece is laid in first, then trimmed. Notice that the second piece extends all the way into the end of the slot, to be trimmed back to a miter joint later. This is done so that the end will wedge firmly in the groove, and not have a floating end (as it would were it chopped for the miter before being installed) which would tend to separate and try to bend around the curve. That's a major secret of keeping the ends tight when you're dealing with sharp bends
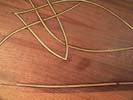
 This is the equivalent view of the major bout area purfling. The work proceeds on both ends of the dulcimer at once. That way, consistency of technique is preserved. We wouldn't want to develop some amazing capability on one end and have it absent on the other end! You can see the hide-glue sizing here and there. One nice thing about hide glue is that it is protein, and thus behaves much like the wood itself. So we don't have to worry about a smear here and there.
 Here is an even better view if how the ends are trimmed to fit tightly into the groove, rather than being mitered before gluing in. With all the curving these strips are doing, you can never tell where the various layers of the purfling strip are going to be in the end, anyhow. So waiting for the whole piece to settle down, get stabilized by being glued in, will give you a more accurate miter joint, even though it seems more difficult to cut accurately in the slot.
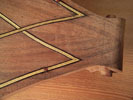 After the back is assembled to the rest of the body, complete with all bracing and linings, the edge purfling is completed. At left and right are close-up shots of the purfling edge strips during installation (and before getting cleaned up!). Notice the little red diamonds, and the miniature mitre joints. To give you an idea of the scale you are looking at in these photos, the purfling is 1/8" wide. In the view at right, the length from the tip of the mitre joint to the first red dot is one inch.
The strips being laid in are built from four layers of wood. There are two inner layers of boxwood, .035" thick each. These are painted black on the surface where they are glued together, to produce a thin black line in the middle. The this piece is sandwiched between two pieces of black dyed veneer, .025" thick each. These add up to a little over .125", with glue thickness thrown in. They are then run through a light pass of the thickness sander, to bring the whole sandwich to 1/8".
Then I slice this sandwich up into .050" strips to make the purfling. You can buy various purfling materials commercially, but I enjoy the freedom of designing and fabricating my own. Gives a distinct touch. The glue is 3M Super 77 Spray Adhesive--you want a joint that will stay flexible, so the layers slide past each other when you bend the strip. (The little red diamonds are made by a similare process from 1/28"X1/28" strips, and are 1/14" square.)