The fretwire slips into the slot in the channel, completing the FlexiFret installation. The fretwire piece should be a slip fit into its channel.

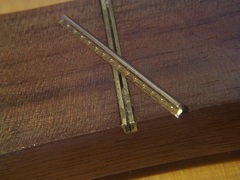
 Here are view of the fretwire being installed in its groove. Note that the triangular barbs on the tang of the fret go in below the top of the channel, and that the fret should rest flush with the surface of the channel.
If the fret is reluctant to enter the slot, use the fine file to remove any burr off each side of the fret tang's ends, narrowing the ends a little (see the photo above, at right). Keep the file's "safe" side up against the crown bottom. Then place the safe edge against the tang and file off any burr at the end of the crown's base. If this doesn't cure the problem see Troubleshooting.
 Now place a small square to span the two frets on either side of the installed FlexiFret, and see if you can rock it back and forth. This is a test for whether the FlexiFret is at the same height as its neighboring frets. If there is any rocking, see Troubleshooting. Next, see if the FlexiFret is low by testing it with the two neighboring lower frets; then test against the neighboring two upper frets. Test all along the length of each fret, to make sure there will be no buzzes under any of the strings
This concludes the FlexiFrets installation. Have fun using them! If you have questions or problems, please Contact Us.
Inserting the Fret into the Channel