The installer will find that installation goes very simply. You will also need these tools.
 Dial caliper or digital caliper. If you have access to an accurate 24" caliper that will enable you to position FlexiFrets at positions all along the fingerboard. If you have only a 4" or 6" caliper, you can still find the correct position by measuring from the apex of the crown of a neighboring fret. Digital calipers are very handy for this work, as there are a few steps where offsets must be taken into account, for which they are extremely handy.
 A series of short to medium size straight-edges. Accurate straight-edges may be found in good quality machinist squares and rules. You should have selection that will allow you to place a straight-edge between each FlexiFret's former and next frets, for detecting buzzes. They will also be used to detect accurately the depth of the slot to be cut for the FlexiFret channel.
 You will also need a small clamp, to clamp the large square to the fingerboard, to define the placement for the router.
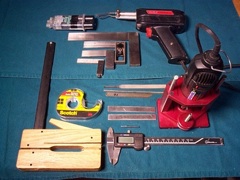
 An accurate small drill/grinder tool, such as a Dremel, Foredom, etc, with a good router base to fit it. The router base should have an accurate depth stop. You may elect to cut the FlexiFret channel slots by hand with a saw, but these instructions will cover the details of getting an accurate slot with a router base and Dremel tool. Note the two 1/16x1/2"x3" straps shown. If you are installing FlexiFrets among neighboring frets, you will need a way to keep the router base from tilting or rocking when it is placed over one but not another. The solution is to attach two straps to the base at places chosen such that the router's position will not be influenced by surrounding frets. The strips may be metal or wood, or even good quality cardboard. They ar attached with double-sided tape (see below).
 I
I use a high-precision router base available from the guitar builder, Bishop Cochrane. This router base has an excellent yet simple depth stop and a fine depth feed control. The 3/32" slot for the channel is cut into the fretboard with a miniature carbide end mill, .090", a (which is then dressed to the final .093" width and thickness with a fine machinist hand file.) See the Bishop Cochrane website at http://www.bishopcochran.com Miniature endmills can be found at Manhattan Supply Corporation, http://www.mscdirect.com
 You will need two small fine-tooth files: a Machist's flat file with one safe side (the one I use for this work is a number 5 cut); and a small square needle file. Make sure the needle file does not have rounded corners, and is sharp right up to the edge. Suitable miniature needle file sets can be obtained from Micro-mark, a miniaturist tool and material supplier, at http://www.micromark.com. The machinists flat files can be ordered from Manhattan Supply Company, http://www.mscdirect.com
You may also need a .016" nut file for troubleshooting. You may be able to borrow one from a luthier friend, but this file will be ground to a small radius at one corner, which will in no way impair its regular use. Nut files can be found at Stewart-MacDonald http://www.stew-mac.com.
 You will need a tube of two-part epoxy. This may be a quick-setting variety, as it is not important that the epoxy be high quality, as very little stress will be put on it. Also get a small quantity of denatured alcohol for epoxy clean-up. If you are installing FlexiFrets among existing frets, you will need a roll of 1/2" double-sided tape to tape the 1/16" shoes to the base of the router (see above).

 You may find it useful to have a clamp of some sort during installation of the channel, to gently clamp the channel against the fingerboard. Such an arrangement might not be possible in all circumstances, but look at your instrument and the table you will be using, and see if there is some arrangement that can be made to put a clamp between the top of the fingerboard, in the region you will be working on, and either the bottom of the instrument or the bottom of the table. See the illustration at right, for an idea.
 In case (heaven forfend!) you need to uninstall the FlexiFret brass channel for correction purposes, use a 140w soldering iron to undo the epoxy bond. I like to use a Weller gun style, for reasons you will see later. But any soldering iron will be useful.
 So that is a complete list of all the tools you need, or may need. Now, let's look at the FlexiFret Installation Kit.
Installation Tools